

The problem most of us have learning how to do long exposure photography (or any photography for that matter) is that a very simple thing is explained in a very technical way. Shutter speeds, apertures, Neutral Density filters… yikes!
This frustration held my growth backs for years. And now I have an opportunity to create the photography guides I wish I’d had. This is my promise to you: by the end of this post, you will understand long exposure photography.
However, you will need to practice to really cement it in!
No one ever got good at something by just reading the book, we have to go through the motions until it becomes engrained!
So grab your camera and start learning this once and for all. As an added benefit, you will also be about halfway to understanding how to shoot in Manual Mode by the end of this one guide. Go you!

Long Exposure Photography Explained
For the sake of visualization, do not think of your camera as an electronic marvel of technology. Instead, look at your camera as a simple box. Strip away all the circuits and buttons and that basic, analog box has one purpose: to collect and store light.
That is it!
If you are looking at your camera and can’t help but see it as something more, perhaps it will be easier to actually find or envision a solid metal box.

That box is completely sealed on all sides, except for one hole at the top that has a cover on it. No light is able to get in as long as that cover is on. With the cover on, you could point it at the sun and it would remain pitch black inside!
What is Shutter Speed?
From now on, that cover will be referred to as the SHUTTER. It performs the same task, in that it prevents light from getting into the hole, only the name has changed.
Easy so far, right? It’s time to take a picture!
When you press the button to take a photo with your “box” camera, the shutter (aka cover) opens up, allowing light into the box for the first time.

After a bit of time passes, the shutter will close again, having allowed a specific amount of light in. We, as the photographers, get to set that time, and it is referred to as the SHUTTER SPEED.
Shutter speeds can be anything from 1/10000 of a second, which is faster than most things move. Or as slow as literal hours. If we are using our box metaphor, the faster shutter speed would have been so fast that we cannot physically observe it as humans!
The slower shutter speed would allow you to go have lunch, have a walk, come home, and have a nap, all in the time that cover remained open allowing light in.
Think about that for a second and try to process what you just read. When we use a “slow shutter speed”, aka we leave our shutter open for long periods of time, we are performing long exposure photography!
Understanding Shutter Speed for MOTION
One of the things long exposure photography allows us to do is control the way motion is viewed. If the shutter only remains open for a tiny, lightning-fast amount of time, the motion of the scene will be frozen.
Accordingly, nothing will have motion blur, because no motion occurs as fast as we just lifted that shutter!
Now let’s think about what happens if we leave that shutter open for, say 5 seconds. You press the button to open the shutter (aka take a picture), and it remains open for 5 whole seconds. What happens if you walk into your shot, dance around, and walk out in that time?
The answer: you will have created motion blur! The entire time the shutter was open, you were in motion, and the camera will record that motion.
Fast Shutter Speed vs. Slow Shutter Speed Example
Let’s use a waterfall as a perfect example. In the first photo, we will use a very fast shutter speed of 1/500; that means the shutter will only be open and allowing light in for 1/500 of a second!
The only thing that would show motion blur at this speed is something moving FASTER than 1/500 of a second.


Notice how you have frozen the water droplets and details in mid-fall by using this fast shutter speed.
Now let’s see what happens when we use a 5-second shutter speed, meaning we will capture 5-seconds worth of motion in one frame.

Notice that now, the motion of the water is captured as a steady stream. It is showing the path of the water as a whole as it moved over the 5 seconds our shutter was open.
We will no longer get water DROPLETS and fine detail, but instead, we capture water constantly in motion. The effect is a steady stream.
A little test for you!
To make sure you are understanding this concept, answer this question in your own head:
If I wanted to photograph a hummingbird without any motion blur in its wings, would I need a very FAST shutter speed, or a very SLOW shutter speed?
The answer is that you would need a VERY FAST shutter speed! In fact, you would need at least 1/2000 to capture a hummingbird in mid-air with no motion showing. That is how fast a hummingbird moves!
If you are with me so far, congratulations! You understand what shutter speed is and, subsequently, how to do long exposure photography! You simply leave your shutter open for long periods of time to capture the motion of clouds, water, or anything else really!
Now we just need to understand how it impacts our exposure. Don’t worry, if you’re with me this far, you’re only a few minutes of reading (and a few hours of practice) from fully understanding long exposure photography and shutter speeds!
Understanding Shutter Speed for EXPOSURE
So all we have to do is leave our shutter open for a few minutes and we are doing long exposure photography, right? Well, not exactly.
Let’s go back to our box camera analogy for a moment. Imagine our box is sitting under a running faucet, but no water is getting in because our shutter is closed.

Our goal is to open the shutter just long enough to completely fill our box with water without it overflowing.
Let’s say we set our shutter speed to 30″. This means water (aka light) will be pouring into the box for 30 seconds.
When we push the button to open the shutter, water starts flowing into our box, filling it up. After a second or two, water starts overflowing, spilling out and causing a mess… And we left it open for 30 seconds!! That’s quite a mess, and the result will be an unusable photo.
Light works the same way as water in this analogy. The flow of the faucet depends on the time of day, aka the amount of light. At night, the faucet is barely dripping because there is not much light. However, at noon, it is on full blast.
You can see, then, that our shutter speed needs to be set not just for the motion we want to capture, but for the amount of light we want to let in! Too much light and we “overflow”, which we refer to as overexpose in photography terms.
Do you understand how shutter speed is responsible for capturing both MOTION and EXPOSURE (aka light)? If so, you are truly way ahead of most beginners and even some amateurs!
Aperture and Filters for Long Exposure Photography
So here is our final segue:
When you are doing long exposure photography, you likely want to capture a long period of motion. Therefore, how do we leave our shutter open for a long time to capture the moving clouds or water without letting too much light in, aka overexposing our images?!
Well, let’s envision that box with a hole under a running faucet. If we want to leave the shutter open for 30 seconds without overexposing, we somehow must allow less water in, right?
We could either make the hole in our box smaller, or somehow obstruct the flow of water coming in. Being that water in this analogy is daylight, we cannot simply turn the faucet off.
However, we can reduce the size of the hole by adjusting the aperture. Additionally, we can use filters to obstruct the flow of water! Both of these techniques work to reduce the amount of light let in.

Setting up your camera in Aperture Priority Mode
It will take another guide to clearly explain APERTURE and what it does. However, for now, think of it as the size of the hole in our box.
As we mentioned, our goal in long-exposure photography is to allow our shutter to remain open for a long period of time while still allowing the correct amount of light in.
At night, we must use a long exposure no matter what since our faucet is barely dripping. During daylight, the water is gushing and we must limit the amount entering our camera.
The first way to limit the light we allow in is to make our hole smaller. In photography, this is known as using a smaller aperture. While you are learning, however, we will let the camera partially control our settings for us.
Eventually, you will do this on your own and you will be on the fast track to becoming a pro-photographer.
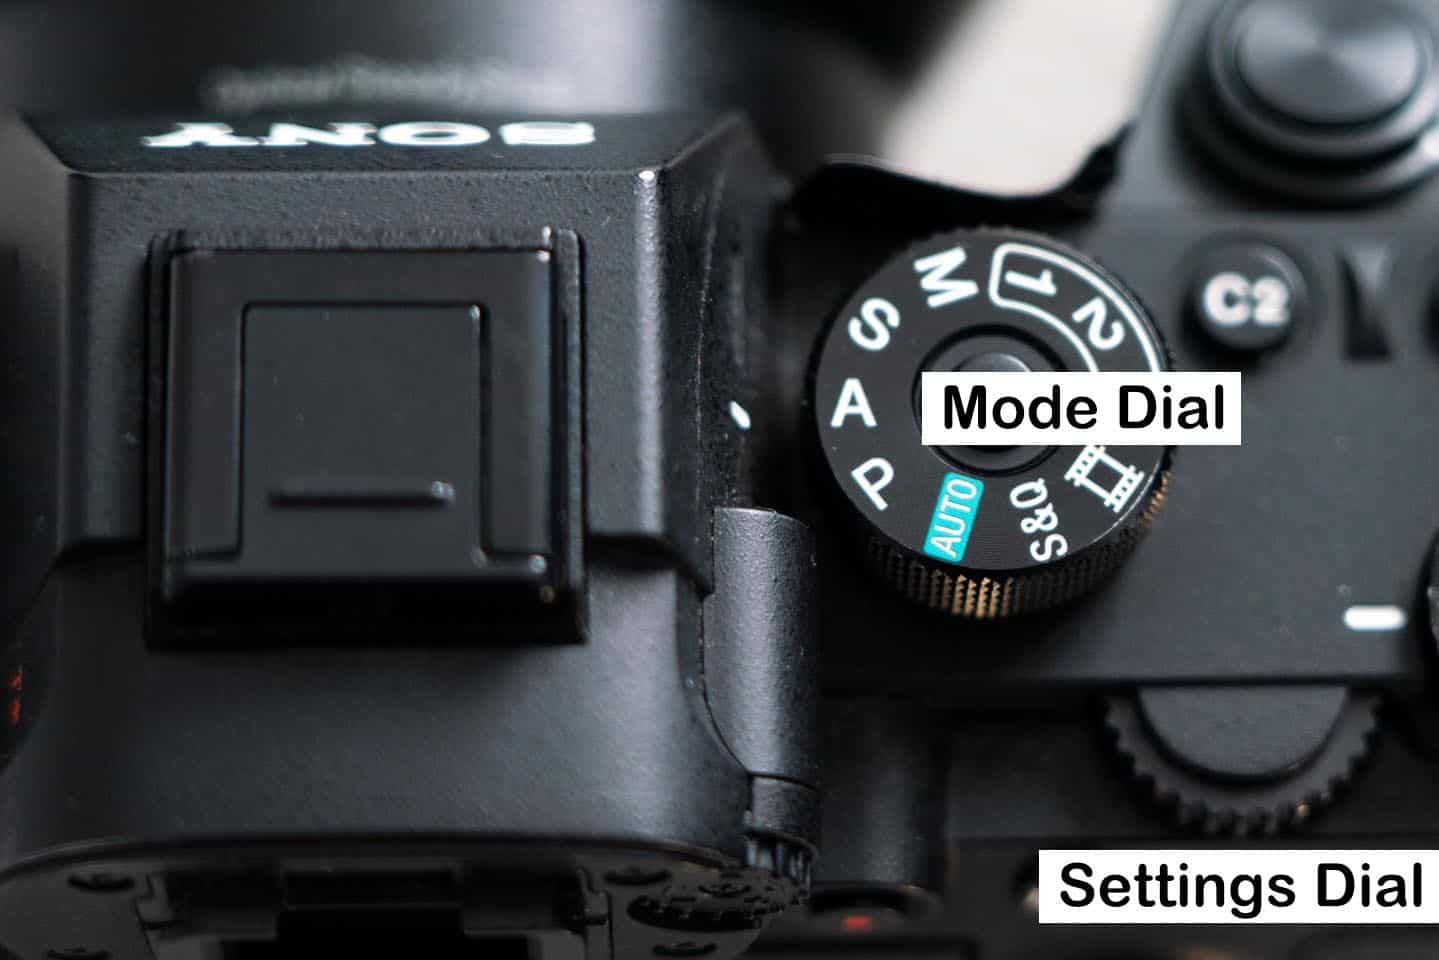
Pick up your camera and spin the “Mode Dial” to be in “Aperture Priority”. The Mode Dial is always found at the top of the camera. It has a series of letters and icons, usually, M / A / S / P will be together, but Canon users will find it as M / Av / Tv / P.
Step 1:
Rotate the dial to be in A mode, or Av for Canon users.

Now that you’ve got your camera to Aperture Priority, you are in control of the Aperture, aka the size of the hole. Seems scary, but I promise it’s not. When you rotate the dials, you will simply be making the hole bigger or smaller.
If our goal is to get the longest shutter speed possible, then we know we need the smallest hole possible, right? Otherwise, our box will overflow. If you’re confused, reference Option 1 in this photo once more:
To control the size of your hole (Aperture), you will need to rotate a spinning dial on your camera. Every model has it in different places, but it will be fairly obvious. It is usually found where your right thumb rests, just under the Mode Dial (see the image below.)
Step 2:
Now that you have located the Settings Dial, remove the lens cap and turn your camera on. Begin spinning the Settings Dial left and right while looking at the back screen of your camera.
If you do not have a backscreen or it is not showing, you may need to consult YouTube or Google! Search for “how to shoot in Aperture Priority with ____”, inserting your camera model there.
95% of you will see TWO settings changing on your back screen.
The first setting to note that is changing will be the letter F with a number next to it, ie f3.5, f5.6, f10 etc. This is your APERTURE, and you are controlling that by spinning the dial. Eventually you will want to learn what this does in full.
For now, spin your Settings Dial until the number next to the letter F is as HIGH as it can be. For most of you, this will be somewhere around F22, though each lens has different capabilities. Whatever it is, just max it out!
What you have just done is made the hole in our box as tiny as it is capable of being.
In Aperture Priority Mode (A / Av), your camera will automatically determine the right SHUTTER SPEED to let in just enough light to fill up our box without it overflowing (aka overexposing).
Step 3:
One last thing to do is make sure your ISO is as LOW as it can go. For most of you, that will be 100, but some may have their lowest as 50 or 200. Regardless, make sure it is the lowest it can be.
Most cameras have an ISO button on the back and many are touchscreen, but not all. If you do not know how to find ISO on your camera, you may need to Google or YouTube that for your specific model.
Without a filter, this will be the slowest shutter speed and therefore longest exposures you can get! You will notice a number next to the F-Stop that was changing as you spun your Settings Dial. That number is your shutter speed.
It may be appearing as a fraction, such as 1/4 or 1/60, or it may be appearing as a standard number such as 0.5″ or 1″. The ” symbol indicates seconds, so 0.5″ is half a second, 1″ is one second, etc. The longer, the better for long exposure photography.
At this point, you will need to practice a few things. Try taking pictures outside in bright light and inside in dim light. Notice how your camera has to choose different shutter speeds based on the amount of light available.
If we think of light as the running faucet, different amount of water pressure will require different amounts of time to fill up our box. Because we have made our hole as small as possible, we are guaranteeing the longest possible shutter times to fill up that box!
At this point, it may be beneficial to bookmark this guide and go experiment a bit on your own. When you get back, we will discuss when and why to use filters to get truly LONG exposures.
Using Neutral Density Filters (NDs) for daytime long exposure photography

If you recall, there were two ways to make sure our box did not overflow with water when we left it open for longer. The first was to make the hole small, which we just covered.
You may have noticed, however, that even with the hole (aperture) as small as possible, the slowest shutter speed the camera is allowing on Aperture Priority mode is not very long; perhaps 1 second (1″) or even 1/5 (one fifth of a second.) What gives?
Well, if the faucet is on full blast, aka we are shooting in broad daylight, even a small hole allows plenty of water to blast though, filling up our box quickly. What can we do if we want to leave our shutter open for, say, 30 seconds?!
The second option was to obstruct the flow of the water coming from the faucet since we do not have control over the actual faucet itself (we cannot turn down the sun, after all).
This is where a NEUTRAL DENSITY FILTER, aka an ND Filter, comes in.
What is a Neutral Density Filter?
Think of an ND filter like sunglasses for your camera. This dark piece of glass goes in front of your camera, obstructing and reducing the amount of light that gets in! That is literally all it is doing.
In our box and faucet example, we put a colander in between the water and our box. This reduced the flow of the water. Some of you may prefer to think of it that way.
For a practical example, let’s say our box was filling up in 1 second with our hole as small as we can make it. If we were able to obstruct half the flow of water, it would allow us a 2-second shutter speed, right?
Because half as much water is getting into our box, meaning it takes twice as long to fill up. The more we obstruct the flow of the water from entering our box, the longer our shutter time (aka the slower our shutter speed) can be!
*BEFORE BUYING A FILTER*
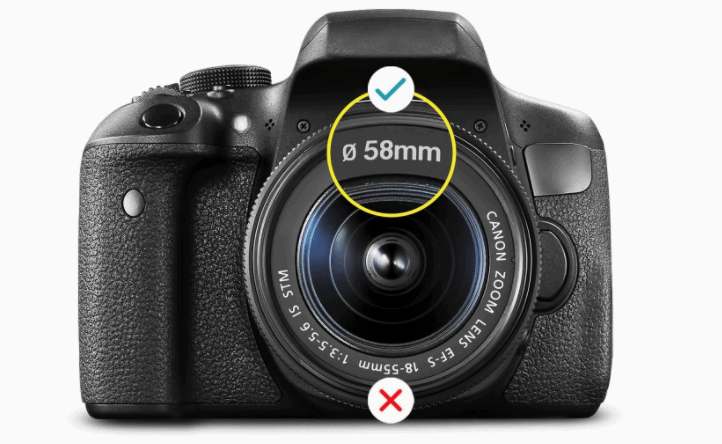
Make sure you know the THREAD SIZE for your lens. Most kit lenses will be 58mm thread size, which you need to match up to the filters you buy! That number is usually displayed on the front of the lens!
If this makes sense to you and you want to try it out, I recommend buying a very cheap ND filter to practice with. These are not the highest quality filters and not something you should use forever. However, they are an excellent tool to learn with.
We personally use the Polar Pro Quartzline filters, but these are more pricey.
ND Filters are an essential for daytime long exposure photography. They come in a variety of “densities”, which basically refers to how much light they will block out.
While you are out practicing, you can and should experiment with different Apertures (aka F-Stops). For example, spin that settings dial to see how your shutter speed changes when you have your F-Stop set to F22 compared to F4. Practice and experimenting is the only way you are going to truly understand all this!
YOU MAY ALSO ENJOY:
Guide to Long Exposure Waterfall Photography
Camera Equipment for Long Exposure Photography
Disclosure: At no cost to you, we receive a small amount for any purchases made using the links below.
There are a few things that come in handy for long-exposure photography, and a few things are essential. Those are covered below.
Tripod
You absolutely must have a tripod if you wish to shoot long-exposure photography. The reason for this is simple; if your shutter is staying open for longer periods of time, your natural handshake will ruin the photo.
A tripod is necessary to make sure the camera remains in place the entire time the shutter is open.
You should eventually consider researching the right tripod for you. However, it is ok to start with something cheap and basic. Yes, it will break, but it is better to learn on a junk car than a Ferrari.
By the time you have broken or grown past this initial cheap tripod and are ready to invest in something better, you will also be better educated on what your specific needs are!
I started with a cheap basic tripod from Amazon and recommend most people learn with something similar. I now use the Manfrotto Be Free when traveling as it’s lightweight and easy to carry on longer hikes.
For times when I require something more stable, I use the Artcise Carbon Fiber Tripod.
Filters

FIRST, make sure you know the THREAD SIZE for your lens. Most kit lenses will be 58mm thread size, which you need to match up to the filters you buy! That number is usually displayed on the front of the lens!
Much like the tripod, I suggest starting cheap only to minimize your investment. Some of you will only ever have photography as a fun side hobby, while others may end up as pros!
Until you know your goals and really understand your needs, start small and cheap. You should limit your equipment expenses until you are at a point where you know exactly what you need and what makes the higher-priced option better.
You already know why you may want to consider buying some ND filters for long exposure photography. However, another filter to consider is a Polarizing Filter, aka CPL.
This filter also cuts the light by a small amount, but more importantly, it removes glare from reflective surfaces. This is extremely useful when photographing water features as long exposures, such as the ocean or waterfalls.

A CPL is the filter I use most consistently in landscape photography. I still recommend most of you start cheaper, and this inexpensive starter bundle provides an ND for learning with as well.
Personally, I am a massive fan of the PolarPro QuartzLine filters. The two I carry with me at all times are the Circular Polarizer and an ND/PL hybrid. This is my recommendation for those of you who prefer to invest in the best even as they’re learning.
Camera Remote
The longest shutter speed your camera will allow is 30 seconds (30″). However, there is a BULB option when you are shooting in Manual Mode. This requires a remote shutter release that plugs into your camera and allows you to leave the shutter open for as long as you want!
A remote is also useful as the action of actually pressing your shutter button to start taking a picture will cause the camera to move, ruining your shot. A remote is useful in avoiding this, but there is a free workaround that will be discussed next.
YOU MAY ALSO ENJOY:
Best Camera Gear for Travel Photography
Other Useful Settings for Long Exposure Photography
2-Second Timer
If you are not using a remote, you will need to set a delay so that your long exposure shot is not affected by you pushing the button and releasing it. The solution is a simple 2-second timer that is built into your camera.
Enable this so that after you push the button, the camera will wait 2 seconds before opening the shutter, thus avoiding shake.

This is enabled differently in each camera make/model. However, all cameras have this option and it is usually indicated with the same icon as shown above.
You may need to consult your user manual or Google to find out how to set the “Drive Mode” for your camera.
Long Exposure Noise Reduction
Enabling this setting will allow the camera to reduce “noise” (aka grain) in your images as a result of long exposures. However long your shutter speed is, it will require this time in between shots. In other words, if you have a 5-second shutter speed, you will need to allow the camera to be still for 10 seconds. The results are subtle, but there is no reason not to use this feature when you are learning.
READ MORE:
Best travel lenses for Sony a7iii and other Sony Alpha cameras
Long Exposure Night Photography

A lot of you may have landed here hoping to explore the world of long exposure night photography. The night skies are one of my favorite things to photograph.
But I recommend drastically managing your expectations if you are still learning photography. As you’ve now learned, the object is to capture LIGHT. However, that is very challenging at night when little to no light is available.
I have created some guides to long exposure night photography which are worth taking a look at once you’ve got the basics mastered. Your ultimate goal should be to learn how to cook, not follow a recipe. The entirety of this guide is a MASSIVE first step in achieving that goal.
For now, however, I will provide a recipe for those who just want to play around. I urge you to at least be mindful of what is occurring in your camera and not just follow blindly, as this will help you progress.
Settings for Long Exposure Night Photography
To start, you will have to turn your MODE DIAL from the A setting (Aperture Priority) to the M setting (Manual Mode). In Aperture Priority (A) mode, you chose the Aperture and let the camera determine the right shutter speed to make sure you did not overexpose your image. However, your camera cannot do that for you at night. We will need to shoot in Full Manual.
F-Stop (Aperture):
Make this as LOW a number as your lens will allow! That will probably be something like F3.5 or F4. This will make our hole as BIG as possible, as our faucet is only trickling at night and we need to get as much as we can.
*A catchy phrase to remember is this: “Little numbers, big hole.”*
You may be confused why F3.5 is a much bigger hole than F22. Do not concern yourself with that yet; it is important and something that should be learned, but it is also important to not overwhelm yourself at this moment. Just remember this one thing: little number = BIG HOLE.
If you are having trouble figuring out how to adjust your F-stop in M mode, consult Google or YouTube inputting the specific model of your camera.
Shutter Speed:
Hopefully, you understand this concept now. We want to leave our shutter open as long as we can and let light continue to accumulate in our camera. Start with your Shutter Speed set to 20″ (20 seconds).
ISO:
Set your ISO at 6400. Again, you may need to consult Google or YouTube if you cannot figure out how to do this.
Equipment:
You will need a sturdy tripod, a 2-second timer enabled (or a remote), and should probably enable long exposure noise reduction as well.
These items were all covered earlier in this blog, so go back to that section if you have skipped down and are not understanding what these do.
Focus:
The biggest challenge you will have at this point is getting your focus set in the dark. That is too advanced a topic to fit into this small section, and available options simply vary too much by camera and lens.
One quick method to try is to leave your LENS (not your camera) on AF (Auto Focus) mode.

Then, have a friend stand about 10-20 yards in front of you with a bright light. Press the shutter button halfway and hope you hear a beep, indicating the lens has achieved focus. Now toggle the switch on the side of the lens to MF (Manual Focus). This will not be perfect, but it is should be good enough while you are learning.
YOU MAY ALSO ENJOY:
How to Photograph the Northern Lights
Final Thoughts on Long Exposure Photography

If you followed this guide all the way through, you need to do two things:
- Congratulate yourself as you have really taken a huge step forward in your photography
- Go out and practice NOW
The sooner you can start cementing your current understanding into your brain, the more likely you are to retain this!
One of my biggest grievances is having my new students leave a class full of understanding and excitement, then seeing them retake the class 6 months later because they never found the time to apply anything they learned and how now forgotten more than they remember. An hour of practice today will save you several hours next week, I promise!
You may also enjoy our guide to long exposure waterfall photography. This will take you through the specifics of photographing waterfalls to capture truly beautiful waterfall photos.
If you found this guide useful, please SHARE IT with everyone whom you think may benefit or on your Facebook. I would also love your feedback, positive, negative, or otherwise, in the comments below!
Enjoyed this Guide to Long Exposure Photography for Beginners? Pin It! 🙂


I have just read upto long exposure and satisfied and appreciate how the author has expanded the knowledge level from zero.
I have read on line about photography but yet not clear about focus, focusing, settings,live view, viewfinder etc all related to focussing, which lense to use for distantobjects etc.
I will complete my reading of this article and comment further. Thanks.