
We are often asked what we use to take our photos, so we’ve compiled a complete list of all the travel photography gear that you’ll find in our camera bags!
We’ve been full-time travelers and professional photographers for the last decade and over that time have changed a lot of our gear and refined it to what we use today. This list is intended to help give you some insight into the photography equipment we use and why we’ve chosen it.
We try to keep this blog post up to date as we update and expand the photography equipment we use. It was last updated in December 2023.
Disclosure: In order to keep providing you with free content, this post likely contains affiliate links. If you make a booking or purchase through one of these links we earn a small commission at no extra cost to you. So a HUGE thank you to you if you click one of these links 🙂
📸 Travel Photography Gear for Professional Photographers and Bloggers
Whether you’re looking for camera gear for travel photography or Instagram, hopefully, you’ll find this list will give you inspiration on what you should have in your camera bag!
From our cameras through to all the accessories and even post-processing software, this is everything we use to take our travel photos.
📷 Camera
Sony a7riii

We have had two Sony a7riiis for several years now and still love them just as much as we did when we bought them.
The Sony a7riii is a full-frame mirrorless camera, so it was a big step up for us from our previous Fuji XT-1 and Canon Rebel.
Mirrorless cameras are becoming an increasingly common choice for travel photographers as they are typically smaller and lower in weight than DSLRs.
This is definitely a bonus for the Sony a7riii which weighs only 1.45lbs (0.66kg). However, it does still get a bit heavier by the time you’ve added on a lens of similar weight!
It has an incredible dynamic range, allowing us to capture both the color in the sky and the details in the shadows at sunrise and sunset.
The photos below show just how good the dynamic range is, allowing us to bring out a lot of detail from the shadows and highlights.


We’ve also found the Sony Alpha series really easy to use and love that the menus and buttons are customizable. However, it is not a budget camera and therefore I’d only recommend investing in it if you are passionate about photography, or being paid for your photos.
For most people wanting to make a huge jump up in quality to full-frame, the Sony A7iii is a better option. It is almost the exact same camera as the A7riii, but it has half the megapixels.
If your photos are not being used for massive, scaled enlargements, you’ll never notice the difference and you can invest those $1000 savings into a nice lens!
🏞️ Lenses
Sony FE 24-105mm f4 G OSS lens


The Sony 24-105mm f4 is our workhorse lens and what we use to take about 85% of our photos! It’s really sharp across the range and covers most of what I need.
At 24mm on a full-frame sensor, it is a wide enough angle to fit in most landscapes we’re shooting, and being able to zoom to 105mm covers objects further away.
If you were going on safari or birdwatching, you would want a telephoto lens that can zoom in more than this. But for travel photography and most of what we shoot, it’s the perfect lens!
A variable focal length (aka a “zoom” lens) provides the versatility to capture an entire scene, or to zoom in on the details, without changing lenses.
The two images below show part of Proxy Falls in Oregon shot with the 24-105mm lens. The image on the left shows the entire scene, shot at 24mm, whereas the one on the right is zoomed in to 105mm to emphasize the details.
📸 READ MORE:
Best travel lenses for Sony a7iii and other Sony Alpha cameras
Sony FE 50mm F1.8

Every traveler has a nifty-fifty in their bag, and Sony wanted to make sure that you chose theirs. The Sony FE 50mm f1.8 is one of our favorite travel lenses for Sony.
We previously had the Sigma 50mm F1.4 Art lens and sold it in order to “downgrade” to the Sony FE.
For perspective, the Sigma weighed over 800g, compared to 186g for the Sony. In other words, the Sony is 5x lighter and much more compact besides. Beyond that, the images looked sharper at F1.8 and above on the Sony than they did on the Sigma.
A fixed (aka “prime”) lens is also perfect if you’re looking to do more portrait or product photography. This lens will give you a really nice blurred background (known as bokeh) at the wider apertures and is great in low light.

Laowa 15mm f2 lens
A wide-angle lens can be great for landscapes, architecture, and astrophotography (night, star, and milky way photography).
We bought the Laowa 15mm f2 lens primarily for astrophotography, in particular photographing the northern lights and the Milky Way.
At 15mm it is wide enough to capture an entire scene and the milky way, and its low aperture allows for shorter shutter speeds.

Tamron 150-500mm f5-6.7 Lens

If your travel photography includes a lot of wildlife or requires some discretion for capturing the moment, a good telephoto lens is essential.
The Tamron 150-500mm f5-6.7 lens is the newest addition to our travel photography gear. While we don’t take it everywhere with us, it is great to have something to capture wildlife or just add a new creative feel.
We compared the Sony 100-400mm, Sony 200-600mm, Sigma 150-600mm, and Sigma 100-400mm before deciding on the Tamron 150-500mm. At the price point, this was easily the best value due to its superior autofocus, sharpness, and max apertures.

☀️ Filters
PolarPro Circular Polarizer Filter

A circular polarizer filter (CPL) is an absolute game-changer and a key part of our travel photography gear!
It’ll help cut the glare on reflective surfaces. This will enhance your colors and if shooting water, give transparency to allow you to see beneath the surface.
When buying a filter, make sure that you get the right thread size for your lens.
We have tried a few different polarizers but hands down the Polar Pro quartz line CPL is our absolute favorite and worth every penny.
After 3.5 years of constant use (and less than ideal care) we are only just considering replacing them due to a few minor scratches. This is significantly longer than some other brands we’ve used in the past that have barely lasted a year.

PolarPro Neutral Density Filter (ND1000/PL)

A neutral density (ND) filter will allow you to take long-exposure photographs in bright conditions. This is particularly useful when photographing waterfalls or bodies of water that you want to smooth out during the daytime.
The images below were both taken at Mono Lake, California, shortly after one another. The photo on the left was taken using a Polar Pro ND1000/PL filter to allow for a long exposure. This gives the image a softer feel as the water is smoothed out.
The image on the right was taken with a shorter shutter speed and without an ND filter. It shows the more turbulent movement of the water.
It is also worth noting that many ND filters will only limit the light being allowed in. The Polar Pro Quartzline we use, however, is also a polarizing filter, allowing us to cut the glare as seen above and create long exposure simultaneously.


🔋 Other camera accessories
Manfrotto BeFree Travel Tripod
A tripod is an absolute must if you are traveling solo and want to be able to capture images of yourself, or if you are hoping to do any long-exposure, low-light photography or time-lapses.
When traveling, we use the Manfrotto Be Free as it’s lightweight and easy to carry on longer hikes.
For times when we require something more stable, we use the Artcise Carbon Fiber Tripod.
If you have a smaller camera, then you will be able to get away with a lighter tripod, such as the Manfrotto Compact Action.
While it is just about able to support the weight of the Sony a7riii with a lens, it isn’t particularly sturdy. We still use this tripod when we are shooting during the day with optimal conditions. However, it isn’t very functional in adverse conditions or for long exposures as it isn’t stable enough.
The tricky thing when choosing a tripod is that while most of us would prefer to travel light, weight = stability.
Remote Shutter Release
We once relied heavily on our remote shutter release, which also served as an intervalometer. However, Sony updated their firmware and now the camera has an in-built intervalometer function.
This has made our remote shutter release redundant! With that said, if your camera does not have this option built in, then a remote shutter is a great addition to your camera bag.
This small device allows you to program shooting times at the press of a button. As an example, you could set the camera to take 1 photo every 10 seconds a total of 5 times.
The camera will then capture 5 images with 10 seconds between each. Not only was this useful for capturing photos of myself when traveling solo, but it was also a necessity for creating time-lapses, like the one above.
Having a remote shutter release also allows for long bulb exposures that are otherwise not possible. Depending on your camera type, you may also be able to achieve this with a mobile app.
Microfiber cloths
You can NEVER have too many microfiber cleaning cloths!
We always have several of them in our camera bags and pockets. They are kind of like hair ties or socks; eventually, they just disappear.
It’s therefore worth buying a few so that you’ve always got one to hand. You don’t want to find yourself stuck with spray from a waterfall or speckles of dust all over your lens without anything to wipe it off, and using your shirt risks scratching your lens or filter!
Spare Lens Caps
While not quite as good at disappearing as microfibers, inevitably you will lose a lens cap at some point. Whether you accidentally leave it somewhere, it goes rolling down a hill, or pops off the camera unnoticed, it will likely go missing!
They are inexpensive and take up very little space so we always have at least one spare lens cap for each lens we use to ensure our lenses are always safe.
Spare Camera Batteries

No matter which camera you have, you’re going to want to ensure you have at least one spare battery (personally we carry two spare batteries for each Sony).
You don’t want to be stuck on location, with an epic shot in front of you, only for your battery to run out. Trust me, I’ve been there.
We also carry spare batteries for our GoPro as we find the battery life on it to be fairly short, particularly when recording videos.
Memory Cards
Similarly to batteries, you also don’t want to run out of memory.
We have a 128GB high-speed SD memory card for each of our Sony a7riiis. The size and speed that you need will depend on a few factors.
We shoot entirely in RAW and the Sony RAW files are around 40MB per photo. On top of that, we also often shoot in burst mode, shooting several images per second, so write speed is important for us.
However, if you’re shooting in jpg mode and only shooting single images at a time, you could get away with a slower, smaller memory card.
We have found that even shooting large RAW files, we’ve never filled up my 128GB card in a day. However, we always clear our cards at the end of the day to an external drive so that we can reformat it and have a fresh 128GB to shoot with the next day!
This brings us to our next essential…
External Storage
If you value your photos/videos, it is absolutely essential you have TWO external storage devices.
All of your memories are being stored on these devices, which are prone to breaking and theft, so the importance of having a backup that you keep separately at all times cannot be overstated.
Cloud Storage
Cloud storage is going to be the best first option for most people. It cannot be dropped, broken, or stolen, and can be accessed anywhere with high-speed internet.
The downside for travel photographers like us is that we’re often in remote places where the internet is slow or not available at all.
As it is vital to keep our memory cards clear, cloud storage is simply not a viable Plan A for our lifestyle. However, if you spend most of your time in one place or only travel to developed regions, this will be your safest bet!
With an Amazon Prime account, you can download the Amazon Photos app and get unlimited photo storage, including RAW files.
Solid State Drive (SSD)
The next best option, and the one we personally employ as my Plan A, is a solid-state drive (SSD).
It is a small USB device that can hold tons of data but is much faster and exponentially more durable than external hard drives.
We made the move to an SSD after our external fell a short distance from the kitchen table… that small fall was enough to break it and undo a day’s worth of work (which could have been MUCH worse).
The downside of SSDs is that they cost a lot more than external drives, but the security, size, and speed advantages make them completely worth the price in our opinion.
External Hard Drive
The last option is an external hard drive. These are the cheapest option by far, but we only use these as our backup drives at this point.
The reason is simple; they are extremely, shockingly delicate. Under that cheap plastic case is a spinning disc with a small metal pin (think of a metal record player).
If the power is lost during use or they are mistreated during transport, that pin can come down onto the spinning disc destroying your data and/or getting pressed and stuck.
Just like that, you’ve lost it all, and recovery is incredibly expensive. We do still use an external as our BACKUP drive, but only because we had already purchased it.
While they may be suitable for some photographers or for use strictly at home, we don’t recommend them for travel photography on the go.
Camera Wrist Strap

Neither of us has personally ever liked the neck straps that come with most cameras. We much prefer having a wrist strap as it feels like the camera is more secure.
I had previously had a basic strap but Sophie bought me a customized leather wrist strap from Mesa Dreams on Etsy. It looks great and they were wonderful throughout the whole process.
You will also want something easily detachable for shooting from a tripod in windy conditions.
GoGrove Camera Bag

It took a long time to find a camera bag that both looked cute and was functional for Sophie. Many bags were too big for her frame, but a few years ago I found her the GoGroove Camera Bag for Christmas.
It is not necessarily the highest quality (she’s on her second bag!) and over time the stitching came undone in areas, and some of the pull tags on the zippers have come off.
However, I am certain she put this bag through much more than anyone else ever would. It was used almost every day for two years with typically 5-10kg of gear in it and was not particularly well cared for!
Despite the few downsides, she still replaced it with the same bag – just in a different color!
LowePro Camera Bag
LowePro specializes in camera bags and cases and offers a variety to choose from.
I have been using the Lowepro Fastpack 250 for 4 years now. It has a more space than Sophie’s, more padding, and also has excellent functionality.
One of our favorite features of the LowePro camera bag (and mine listed above) is the easy, side access to the camera.
We’d highly recommend the LowPro line for any guys out there, or even as a girl if you have a bit more gear to house and don’t mind a bulkier bag!
🌊 Underwater Photography
Sony Rx100 VI
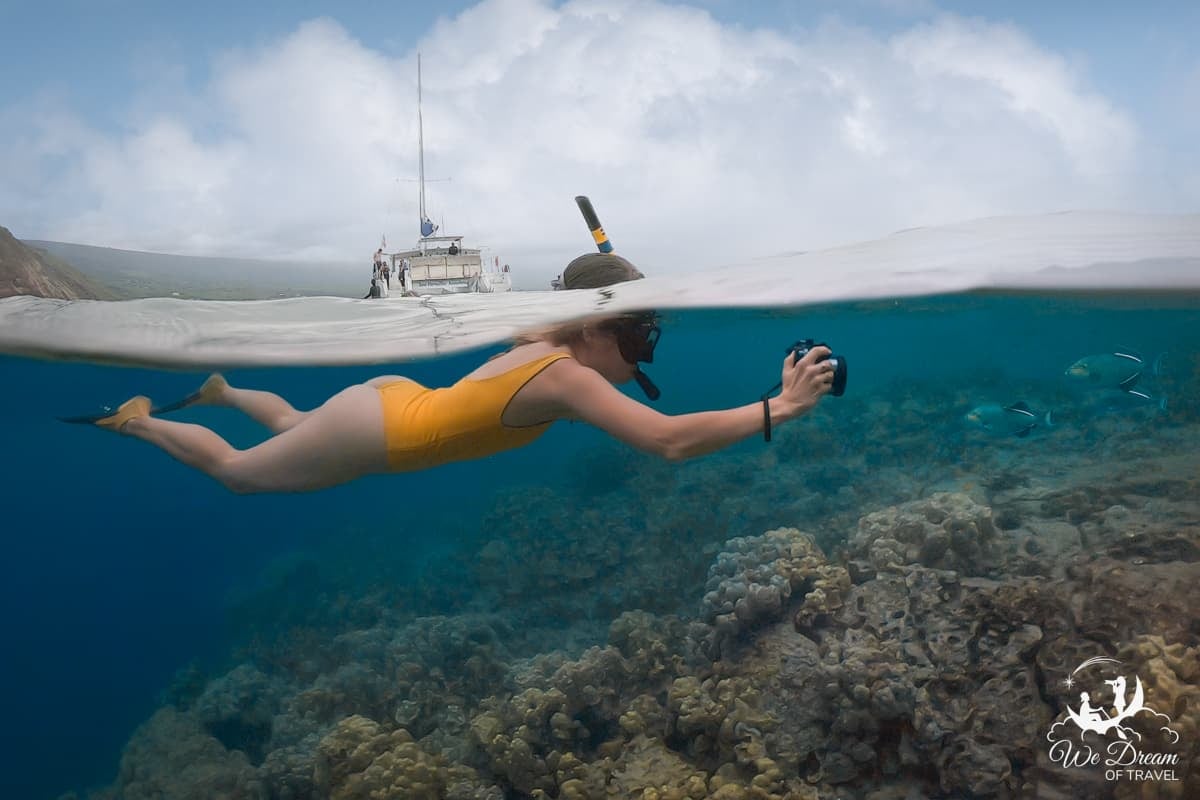
We have had the Sony Rx100 VI for a couple of years now and find its small size ideal for travel photography.
This compact zoom camera offers excellent image quality in a small, lightweight body. With its 24-200mm lens you pretty much always have the range you need without having to worry about lens changes.
We love that it has the option for manual mode and shoots in RAW.
Additionally, we have underwater housing for it too. This allows us to capture stunning underwater photos at a much higher resolution than our Go Pro.
The latest model in the Sony RX100 series is the VII.

GoPro

The GoPro is a great camera for any adventure activities you do.
Unlike its predecessors, it is waterproof to 10m without any external housing. It is also a great tool for video and underwater photography.
The image below was captured on a night dive in Kona, Hawaii, using the GoPro Hero 7 with underwater housing.

The GoPro line is currently up to the GoPro Hero 12, so ours is somewhat outdated. However, we personally haven’t felt the need to upgrade.
While the GoPro is excellent for videos, it is not so good for travel photography. As we don’t do a lot of videography work, we preferred to invest in the Sony Rx100 VI and underwater housing for underwater photography, as previously mentioned.
Polar Pro FiftyFifty Dome


Have you ever wondered how people capture images with half the photo above water and half underwater?! Well, this is how; dome housing.
The Polar Pro FiftyFifty dome is an essential part of our camera gear, particularly in tropical climates. We love the creativity it has allowed.
🚁 Aerial Photography
DJI Mavic Air 2 Drone

Having a drone has opened up so many opportunities when it comes to photography. It has allowed us to photograph an entirely new dimension and see the world in such a new way.
We’ve owned various DJI drones and currently use the DJI Mavic Air 2. It is one of the best drones for travel, and we would definitely recommend getting this one if you’re looking to buy your first drone.
It has great image quality in a compact size that makes it ideal for traveling.
It is worth noting that drone laws are becoming increasingly prevalent and more strictly enforced, making it difficult to fly in many places. Always check local laws before flying.
Drone ND16/PL

We almost always fly with a ND16/PL on our drone.
As travel photographers, the polarizer element of this filter is the more important feature. As previously mentioned, it enhances colors and cuts the glare that is magnified in aerial photography.
For videographers, the ND function is essential to allow an appropriate frame rate.
Spare Drone Battery
The most restrictive factor that we’ve found to aerial photography is battery life. You will only get about 20-25 minutes of flight time per battery and it usually takes about 45 minutes to recharge it.
Therefore, we highly recommend getting at least one spare drone battery so you can swap it out immediately and keep flying while the other battery is on charge.
We opted for a non-DJI model battery for the Mavic Pro after one of ours crapped out on us. We read a lot of reviews for each and it seemed the only difference was the price tag.
However, if your drone is still within warranty, using a non-DJI battery may invalidate the warranty so make sure you check that first. Also, we’ve yet to find a non-DJI option for the Mavic Pro 2.
💻 Photo Editing
Apple MacBook Pro
Photo editing software can be very demanding and therefore you need a computer that can keep up.
The MacBook Pros have excellent processors that keep your computer speed up even when running photo editing software.
Additionally, the retina display of Macbooks ensures your display quality is consistent at varying angles and exterior lighting conditions, which is essential for editing photos.
After both having our MacBooks for over 5 years we finally upgraded to the 2021 16-inch MacBook Pro. It’s amazing how fast the new model is in comparison and the M1 chips are supposedly even better for photo editing software.
Adobe Photoshop Lightroom
Every single photo I take is edited with Adobe Lightroom and often Photoshop too. The desktop version of this software requires a paid plan.
However, the mobile version of Lightroom is available for free and has almost all the same functionality.
Personally, we both prefer the desktop version but if you’re wanting to edit photos on the go, then this is a great option.
Starry Landscape Stacker
We started using Starry Landscape Stacker just over a year ago and it has definitely helped to improve the quality of our astrophotography.
It essentially merges a stack of 10-50 images (depending on how many you take) to reduce noise in the photo, while keeping all of your stars. If you are looking to take photos just for a blog or Instagram then you can definitely skip this.
However, if you are looking to print your night images on a larger scale, then this is definitely some software to consider.
With that said, SLS is only available for Mac users! If you are using a PC, Sequator offers a similar service.

Power Bank
We never leave home without a power bank!
Between editing photos, being present on social media and mapping our way with Google Maps, we rarely get through the day without needing to charge one of our phones.
Our favorite is the Anker PowerCore power bank as it’s not too heavy and can charge my iPhone about 8 times. It’s also handy for charging the GoPro and drone remote while on the go.
📄 Summary of our most used photography gear
- Camera: Sony a7riii
- Favourite lens: Sony 24-105mm f4
- Wide angle lens: Laowa 15mm f2 lens
- Portrait lens: Sigma Art 50mm f1.4 lens
- Circular Polarizer: PolarPro Quartzline CP
- Neutral Density Filter: PolarPro Quartzline ND1000/PL
- Tripod: Manfrotto Be Free
- External Storage: SanDisk 2TB SSD
- Underwater: GoPro Hero & Sony Rx100 vi
- GoPro Dome: PolarPro FiftyFifty Dome
- Drone: DJI Mavic Pro 2
- Laptop: Apple MacBook Pro
- Power bank: Anker PowerCore
- Camera bag: GoGroove
- Editing: Adobe Photoshop Lightroom
Enjoyed reading our Travel Photography Camera Gear guide? PIN IT!


Such a great post!!! thank you so much for all of these tips!
Thank you Merrie.
AH THIS IS GREAT! I just got the Sony A7Riii and I was looking for a good filter! Thanks!
Ooh do you love it?! I really can’t recommend the Polar Pro filter enough! I’ve tried a few others and none have come close.
As a fellow travel photographer, I love this list! So many good items, and I wish I had an unlimited budget to get them all. I’ve been using a polarizer for a while, super useful for glare and haze though I find the colours better with yours. I would love to get a drone one day too, thanks for your recommendation!
It took a while before I found a polarizer that I loved, but this one has been great. A drone is always a fun addition too 🙂
Wow, your photos are fantastic!! I love seeing unedited vs edited too, because it shows how much editing actually goes in to some photos. Thanks for sharing such a comprehensive list, I’ve never really looked at filters but the results make such a difference.
Thank you so much! Filters are definitely worth investing in, they really do make such a difference!
I loved all the recommendations! I still have to buy a drone and I’m following your advice 100% – I love your photos!
Thank you so much Diana! A drone is an absolute game-changer!! You’ll love it I’m sure.
Thanks for sharing your camera tips! I find it really interesting to see what kit travel photographers use. Having just got back into blogging and photography after a break my kit is probably overdue a refresh so I’m going to be looking into some of your recommendations!
Hannah
Welcome back!! Buying new gear is always so exciting!
I looove this post, Sophie, thank you so much for sharing your tips with us. Looking for a ND for my camera these days so I’ll look into your tips this week 🙂
Thank you Tina! Oooh let me know what you end up with 🙂
Amazing shots. However you seem to be the subject of most of them. Are you using a tripod with a timer for these? OR is someone else the photographer here? Underwater and drone shots must require a helping hand no? Can you comment on your process for when you want to be in the shot?
Thanks so much!! And great questions.
It’s a combination of other people (mainly my partner Adam) and tripod. I used to travel solo so took all my own photos on tripod. When I don’t have Adam with me (and sometimes even when he is there!), I prefer to take shots with a tripod whenever possible rather than ask someone else as I can then get the exact shot I want!!
I edit all of my own photos though, no matter who takes them. I use the remote I mention in the blog post to get the shots I want of me. I’ll usually set my camera up on the tripod with the composition how I want it, snap a bunch off and readjust if necessary. I can be difficult to judge well how it’ll look with me in it or exactly where I’ll need to be.
For underwater, yes those are all handheld so have been taken by other people. Either a mermaid friend or Adam. The drone are either self-taken on a timer (which is inbuilt on the drone remote) or by Adam. Feel free to ask away if you have any other questions 🙂